July 1, 2023: Javascript to Split PDF Into 5 Page Segments and Save & Rename
You can use javascript code in Adobe Acrobat to extract set ranges of pages from a PDF file and then save and rename each extracted PDF range as a new file.
A user named vvb posted the following code here:
/* Extract Pages to Folder */var re = /.*\/|\.pdf$/ig; var filename = this.path.replace(re,””); var lastPage=this.numPages-1; { for ( var i = 0; i < this.numPages; i = i + 2 ) this.extractPages ({ nStart: i, nEnd: i + 1, cPath : filename + “_page_” + (i+1) + “.pdf” }); };
This code can be inserted in Acrobat and edited so that it takes 5 pages at a time from a source PDF file and then names them sequentially with a prefix.
In Acrobat go to More Tools and select Action Wizard. On the top toolbar select the option for ‘New Action’. In the ‘More Tools’ menu select the ‘Execute Javascript’ option – doubleclick on it so it appears in the right pane.
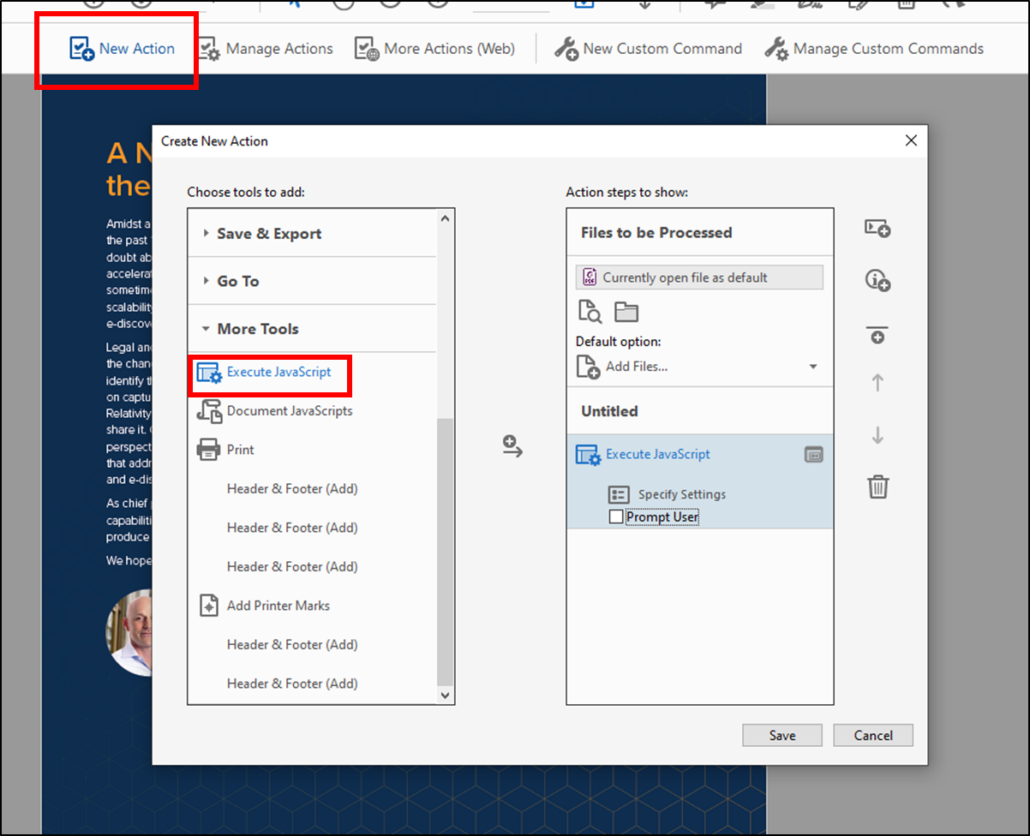
Uncheck the ‘Prompt User’ option, and then click on ‘Specify Settings’.
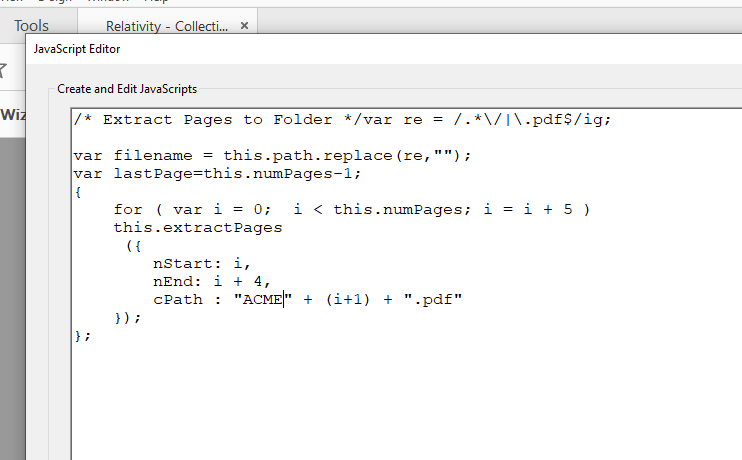
Edit the code so that the line beginning, ” for ( var i = 0; i < this.numPages; i = i + ” specifies how many pages you want each PDF to be., and the line beginning “nEnd: i + ” ends with one number less. Modify the line beginning, ” cPath : ” so that it has the letter prefix for each file. The script will name each extracted file with the page number from the original file that the excerpt begins with.
/* Extract Pages to Folder */var re = /.*\/|\.pdf$/ig;
var filename = this.path.replace(re,””);
var lastPage=this.numPages-1;
{
for ( var i = 0; i < this.numPages; i = i + 5 )
this.extractPages
({
nStart: i,
nEnd: i + 4,
cPath : “ACME” + (i+1) + “.pdf”
});
};
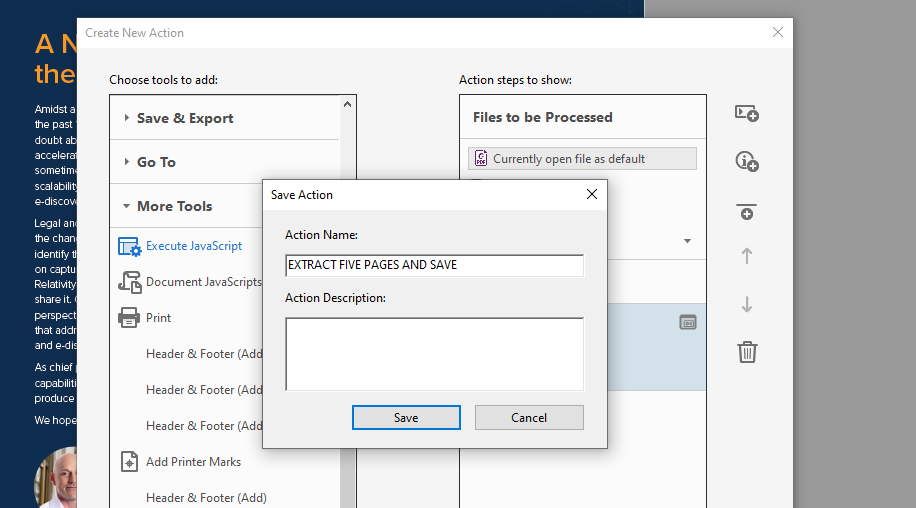
Save and name the action.
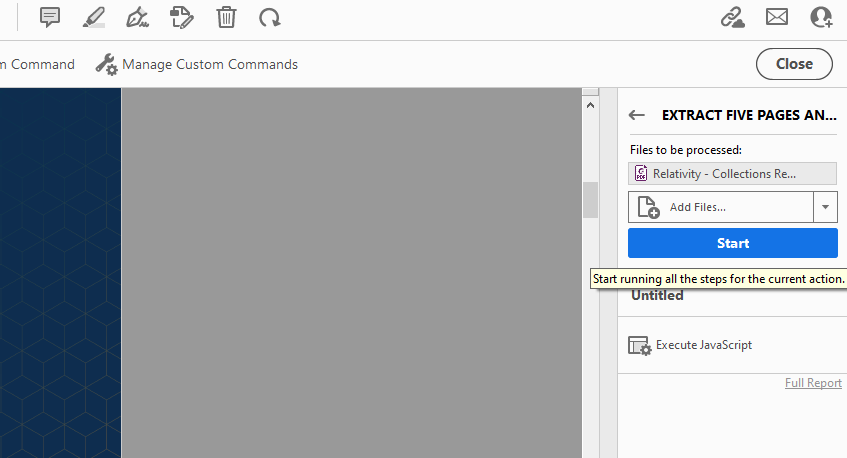
Click on the action in the Actions List and then select the files that you want to run it on. Click the ‘Start’ button.
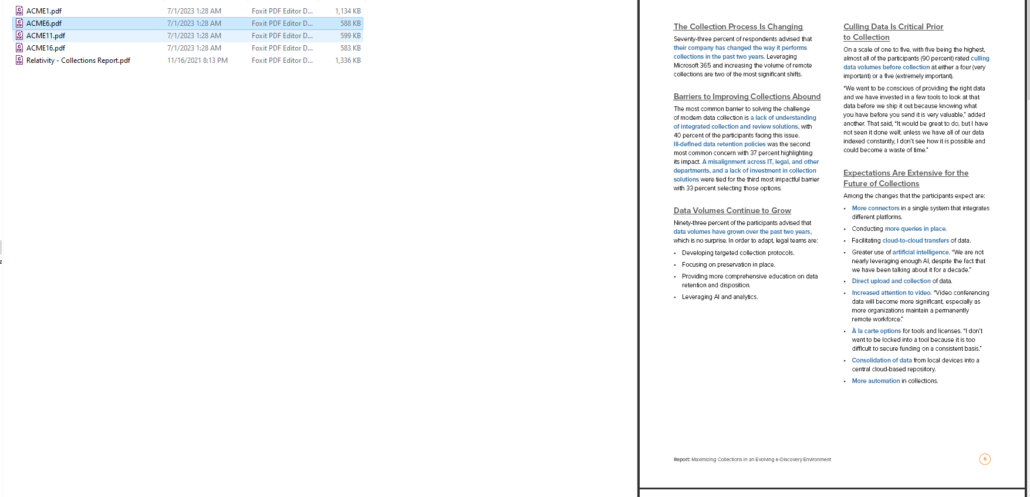
The script will create a new file (in the same folder as the source file(s)) named with the prefix you enter in the code and the page number on which the excerpt begins.
July 8, 2023: Formula to Extract Dates From Text in Cells
If you have a long column in an Excel spreadsheet which contains document descriptions for which dates are given in a nonstandard format, you follow the below workaround to extract the dates into a separate column.
1. Begin by using this formula posted here by Extend Office :
=MID(A2,MIN(IFERROR(MIN(FIND({0,1,2,3,4,5,6,7,8,9},A2&”0123456789″,1)),LEN(A2)+1)),LOOKUP(1,0*MID(A2,ROW(INDIRECT(“1:”&LEN(A2))),1),ROW(INDIRECT(“1:”&LEN(A2)))) + 1 – MIN(IFERROR(MIN(FIND({0,1,2,3,4,5,6,7,8,9},A2&”0123456789”,1)),LEN(A2)+1)))
. . . to extract out numerical dates. This formula will extract dates separated with both forward slashes, periods and hyphens. Simply place it in a column adjacent to the column with the document descriptions and then pull it down alongside for all of the descriptions.
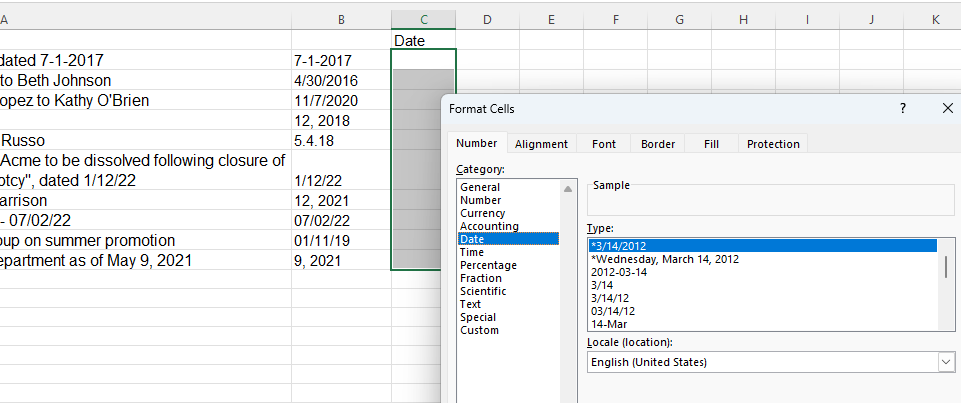
2. The formula will extract out dates entered in a numerical format but it will also return values for descriptions which do not have dates in this format. In order to account for these, in a third column set the format to the MM/DD/YYYY date format.
3. Then copy and paste the dates returned by the formula to NotePad to get clean, plain text. Paste the dates back into the new Excel column and the correctly extracted dates will be in date format.
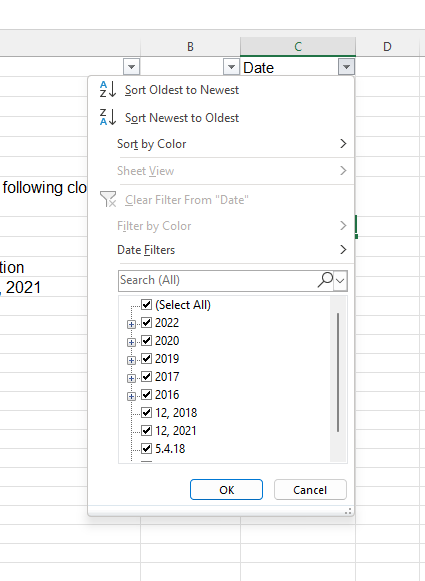
Even though the formula extracts dates separated with periods It’s necessary to find and replace them with slashes in the new Excel column, even though this is not necessary for the hyphens.
4. The next step is to parse out the spelled out dates. To do this we will prepare a SUBSTITUTE formula to run multiple find and replaces so there is a pipe delimiter before each month and after each year.
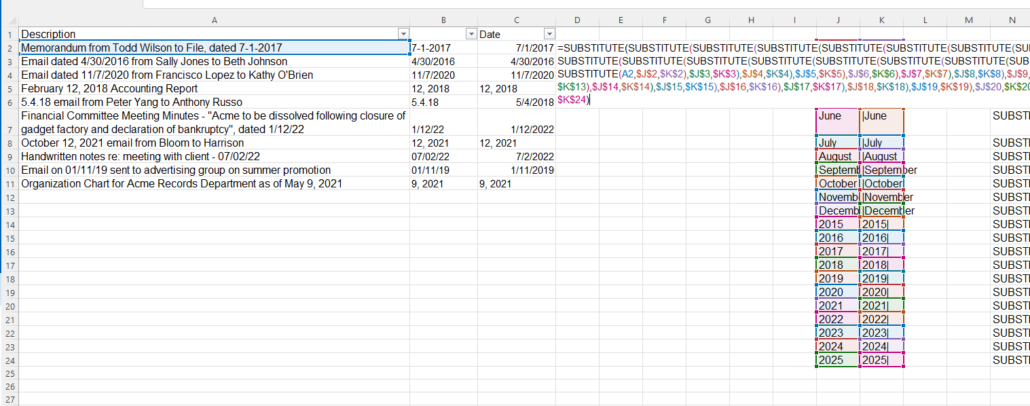
=SUBSTITUTE(SUBSTITUTE(SUBSTITUTE(SUBSTITUTE(SUBSTITUTE(SUBSTITUTE(SUBSTITUTE(SUBSTITUTE(SUBSTITUTE(SUBSTITUTE(SUBSTITUTE(SUBSTITUTE(SUBSTITUTE(SUBSTITUTE(SUBSTITUTE(SUBSTITUTE(SUBSTITUTE(SUBSTITUTE(SUBSTITUTE(SUBSTITUTE(SUBSTITUTE(SUBSTITUTE(SUBSTITUTE(A2,$J$2,$K$2),$J$3,$K$3),$J$4,$K$4),$J$5,$K$5),$J$6,$K$6),$J$7,$K$7),$J$8,$K$8),$J$9,$K$9),$J$10,$K$10),$J$11,$K$11),$J$12,$K$12),$J$13,$K$13),$J$14,$K$14),$J$15,$K$15),$J$16,$K$16),$J$17,$K$17),$J$18,$K$18),$J$19,$K$19),$J$20,$K$20),$J$21,$K$21),$J$22,$K$22),$J$23,$K$23),$J$24,$K$24)
. . . although this formula may look detailed it is not difficult to write. Type January in a cell in column J and then pull it down 11 cells so each of the months is listed. Then enter the year which is the earliest for which there are documents in your set, and then pull it down to the end of the documents’ date range. In the column to the right enter a pipe delimiter before the months and after the years like this:
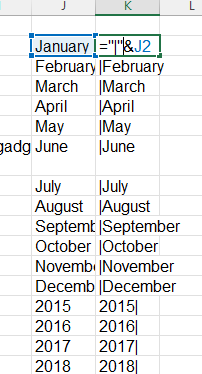
The first column will have the values that the SUBSTITUTE formula searches for and then the second will have the values that it adds in as replacements.
5. Next enter “SUBSTITUTE(” in a column for all of the months and years, and then enter absolute references for the cells with the values to be searched for in one column, and then those with the replacement values in another column. In between these columns enter a column with just a comma in each cell, and to the right enter a column with “).”.
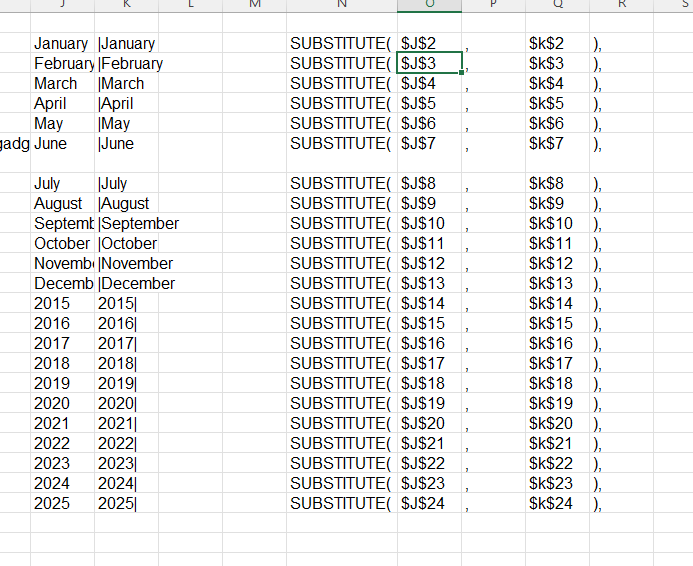
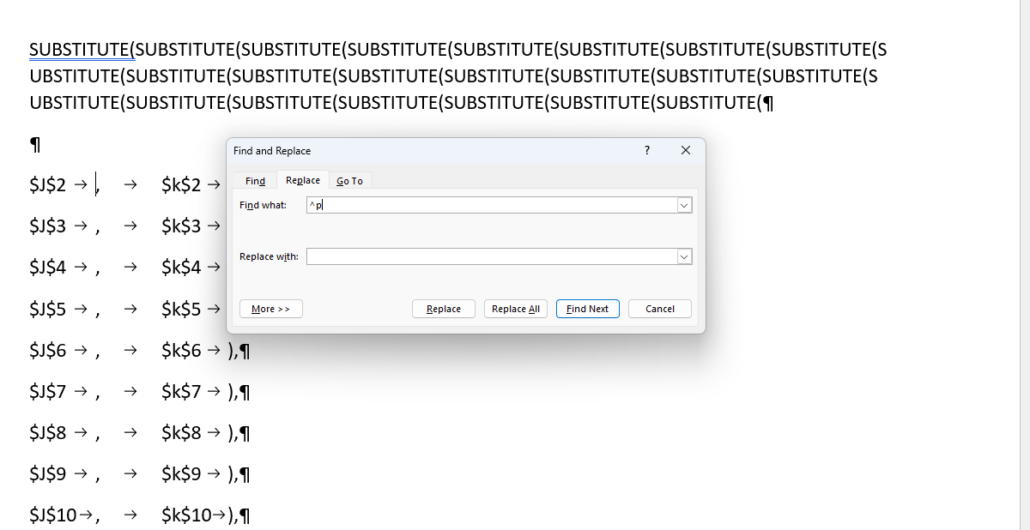
6. Copy and paste the ‘SUBSTITUTE(‘ entries in a Word document and then remove all of the paragraph breaks by finding and replacing “^p”. Then do the same for the other columns on the right but remove the tabs by finding and replacing “^t”.
7. In between the SUBSTITUTE command and the rest of the formula enter a reference to the first cell in the Excel spreadsheet with the document descriptions. You should get a formula which functions this way:
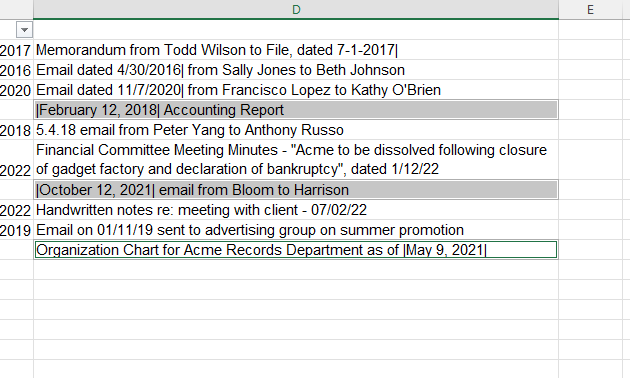
8. The formula should put delimiters around the spelled out dates which you can use to separate them into a new column using the Text to Columns tool on the Data tab. Copy and paste the formula results as values first.
9. In the column with the reformatted dates from the first formula filter for only the non-date entries
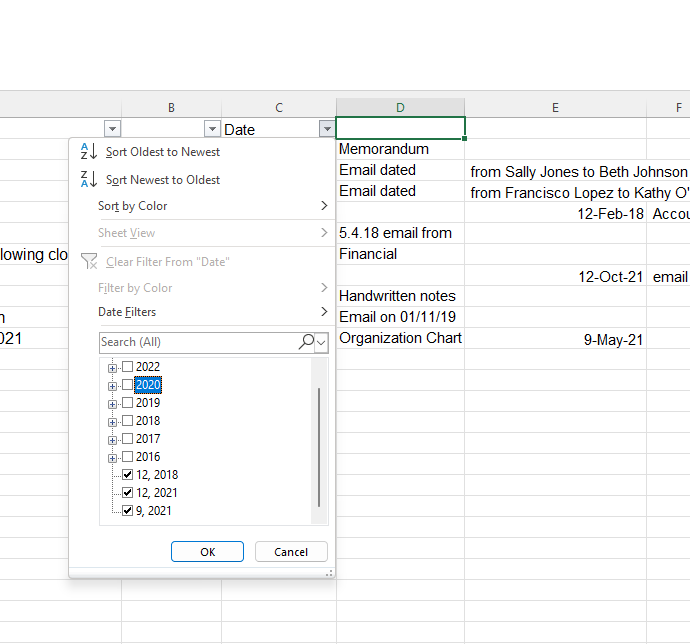
10. Then simply add the values for the spelled out dates using a reference to the column with the parsed out data.

11. We are left with one column with all of the dates in the descriptions.
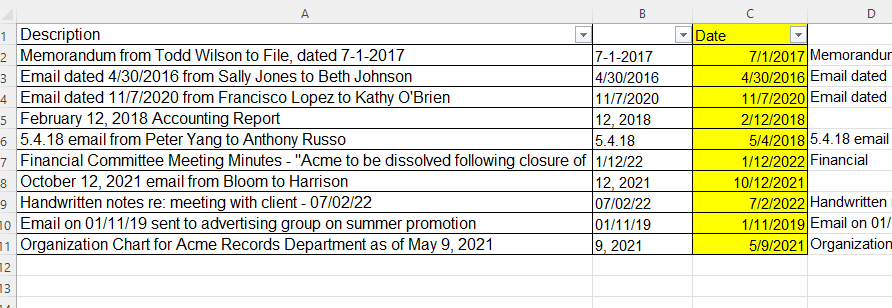
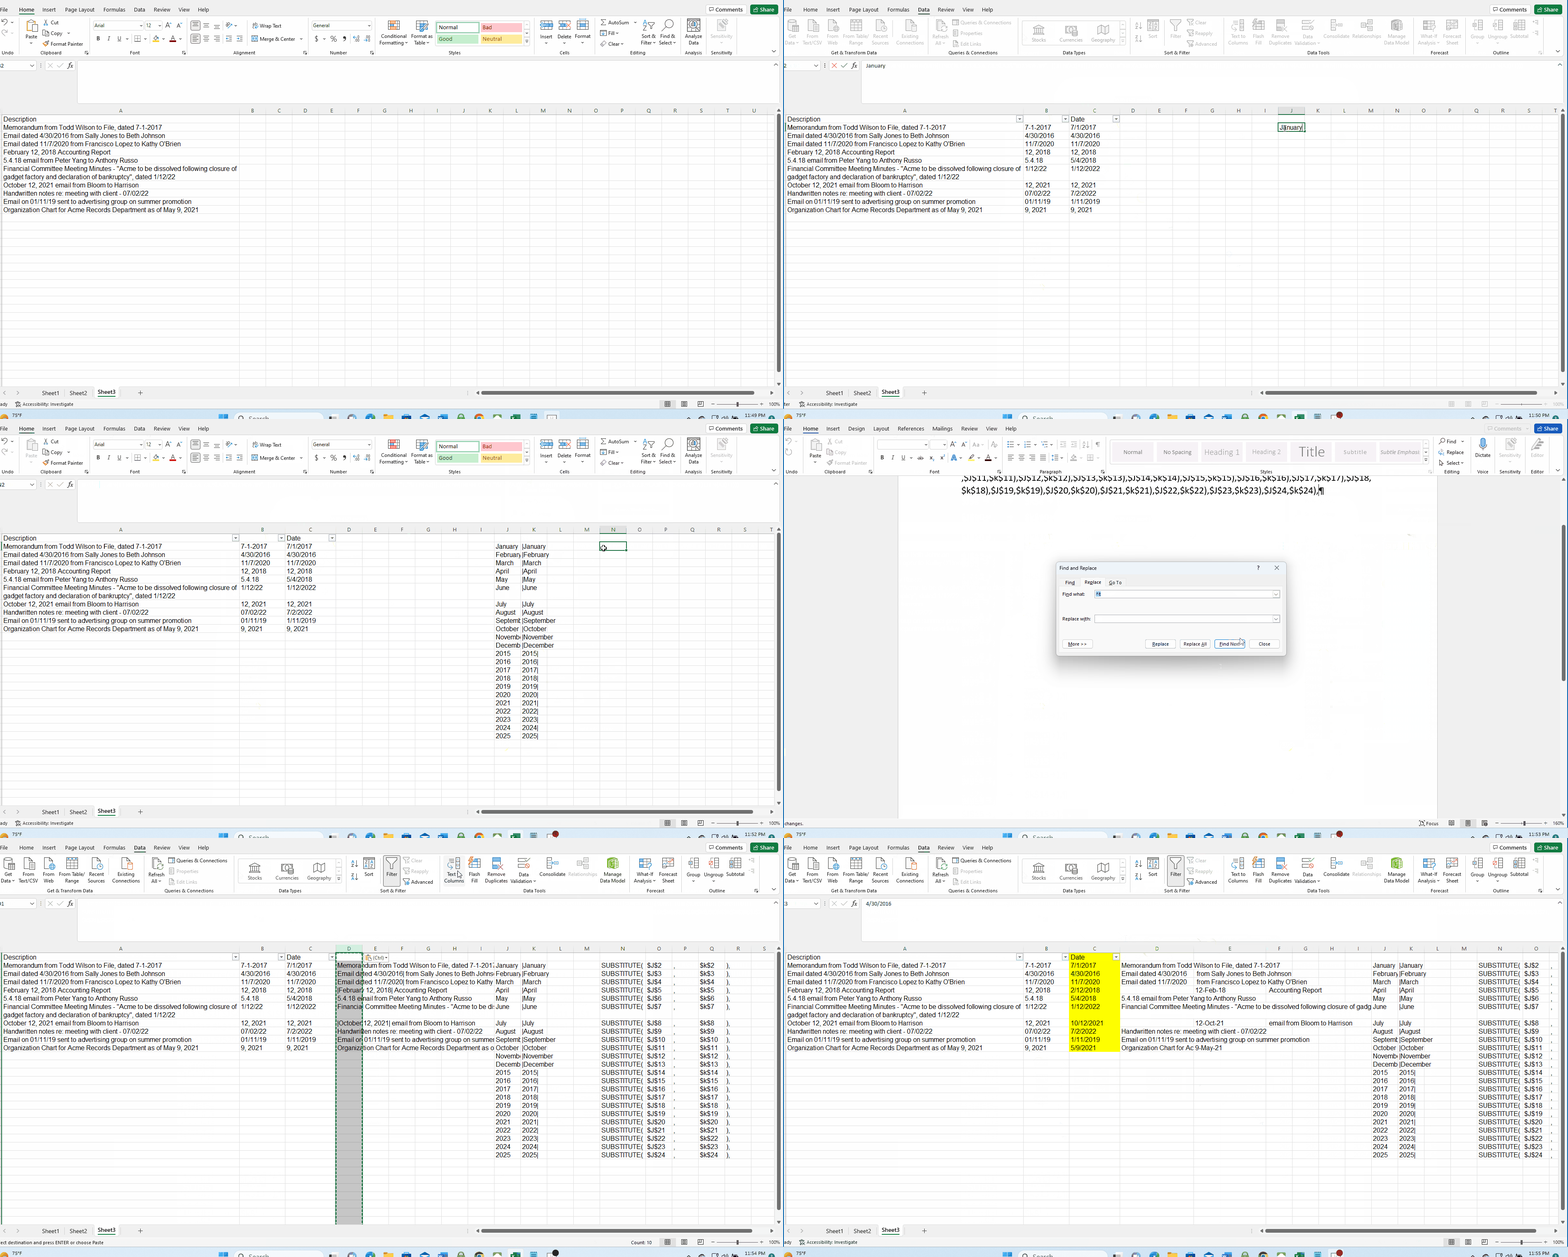
This process does not take long. See this demonstration video:
July 16, 2023: Finding the Last Time a PC Was Started
If you want to find out the last time a Windows 11 PC was powered on, or shut down you can use the Event Viewer application.
Bring up Event Viewer by searching for it Windows. It will be preinstalled.

In Event Viewer, open the Windows Log menu and click on ‘System’
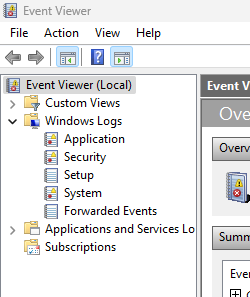
Bring up ‘Filter Current Log’ from the Actions pane on the right. Enter ‘6005’ in the Event ID field.
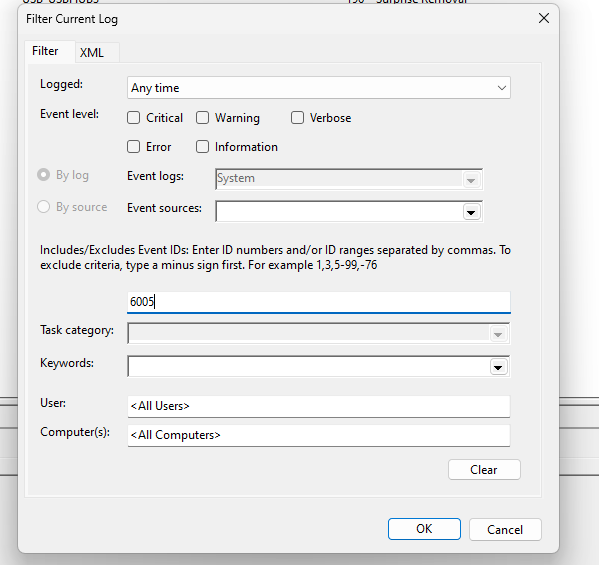
You can sort in the results by the date and time to find the latest time the PC was started.

Use 6006 as the Event ID to find when the PC was shut down.
July 22, 2023: Highlight Multiple Strings in a Word Document
If you want to highlight multiple strings in a Word document, you can do so by utilizing a simple macro posted here, by Susan Harkins with Tech Republic.
In this example we have a document in which we want to search for any one of five terms.
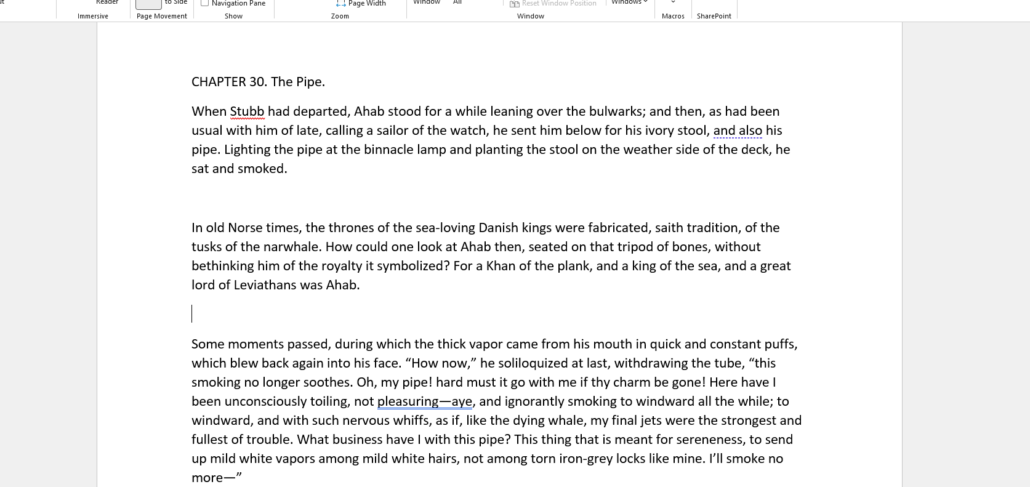
Edit the macro, posted below, so that the strings or words we want to highlight are listed one by one in the lines beginning ‘WordCollection’. Set the number for each of these things in the parentheses after ‘WordCollection’ so that each term is successively numbered, but begin with zero:
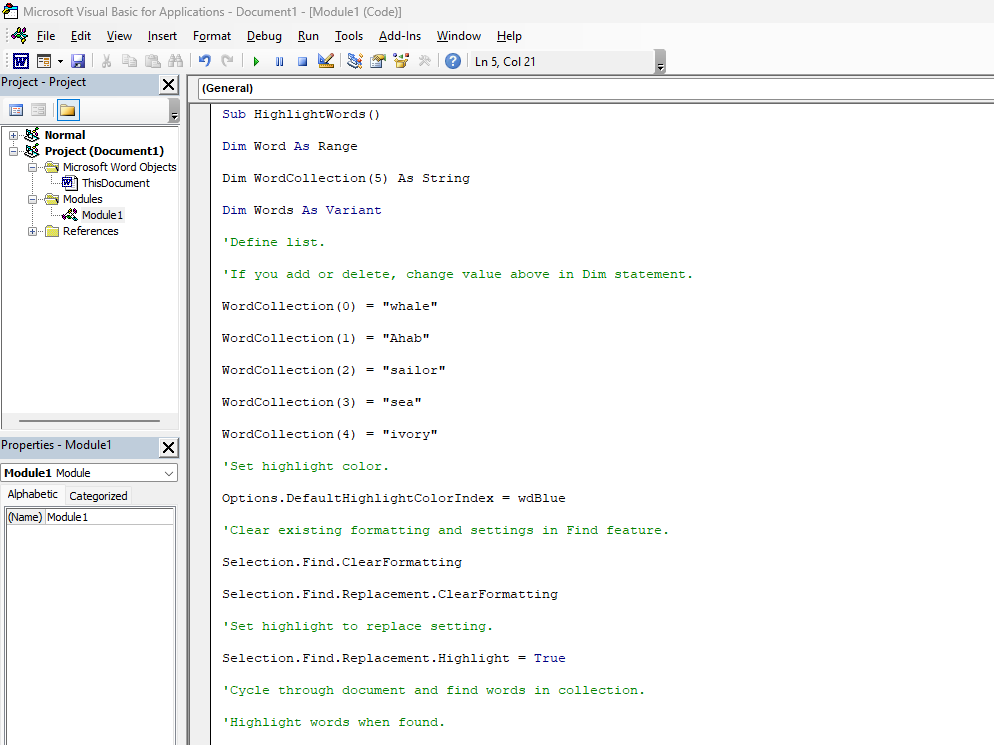
On the third line set the number after ‘Dim WordCollection’ in parentheses to the match number of terms you’re searching for. To be clear, if the last term is preceded by ‘WordCollection(4)’ set the number on the third line of the visual basic code to 5.
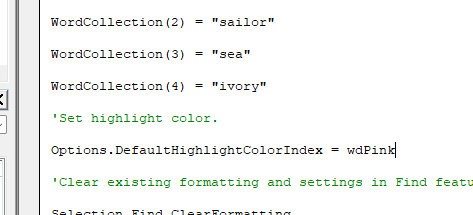
You can set the color of the highlighting on the first operative line after those in which the searched for terms are listed.
The macro does take a good deal of time to run. If you are searching for multiple strings in a long document, it may take several minutes to finish running.
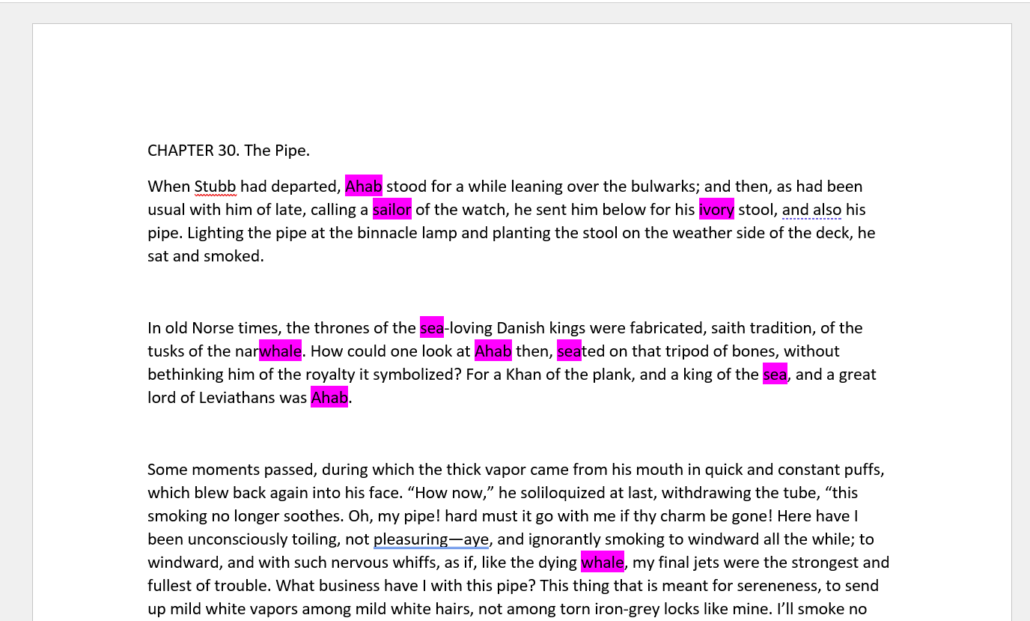
Searched for strings which appear as part of longer words will be highlighted.
As always, this was tested and confirmed to work correctly by Litigation Support Tip of the Night.
Sub HighlightWords()
Dim Word As Range
Dim WordCollection(5) As String
Dim Words As Variant
‘Define list.
‘If you add or delete, change value above in Dim statement.
WordCollection(0) = “whale”
WordCollection(1) = “Ahab”
WordCollection(2) = “sailor”
WordCollection(3) = “sea”
WordCollection(4) = “ivory”
‘Set highlight color.
Options.DefaultHighlightColorIndex = wdPink
‘Clear existing formatting and settings in Find feature.
Selection.Find.ClearFormatting
Selection.Find.Replacement.ClearFormatting
‘Set highlight to replace setting.
Selection.Find.Replacement.Highlight = True
‘Cycle through document and find words in collection.
‘Highlight words when found.
For Each Word In ActiveDocument.Words
For Each Words In WordCollection
With Selection.Find
.Text = Words
.Replacement.Text = “”
.Forward = True
.Wrap = wdFindContinue
.Format = True
.MatchCase = False
.MatchWholeWord = False
.MatchWildcards = False
.MatchSoundsLike = False
.MatchAllWordForms = False
End With
Selection.Find.Execute Replace:=wdReplaceAll
Next
Next
End Sub
July 29, 2023: Regex Search to Find and Replace Multiple Strings
In order to find and replace multiple strings using regular expression you can use this format:
Find: (FindA)|(FindB)|(FindC)…
Replace: (?1ReplaceA)(?2ReplaceB)(?3ReplaceC)…
However if the operation is run this way it will not take word boundaries into consideration and will replace strings you search for which appear in the middle of other words. So if you run a search like this to capitalize the first names in a list of addresses:
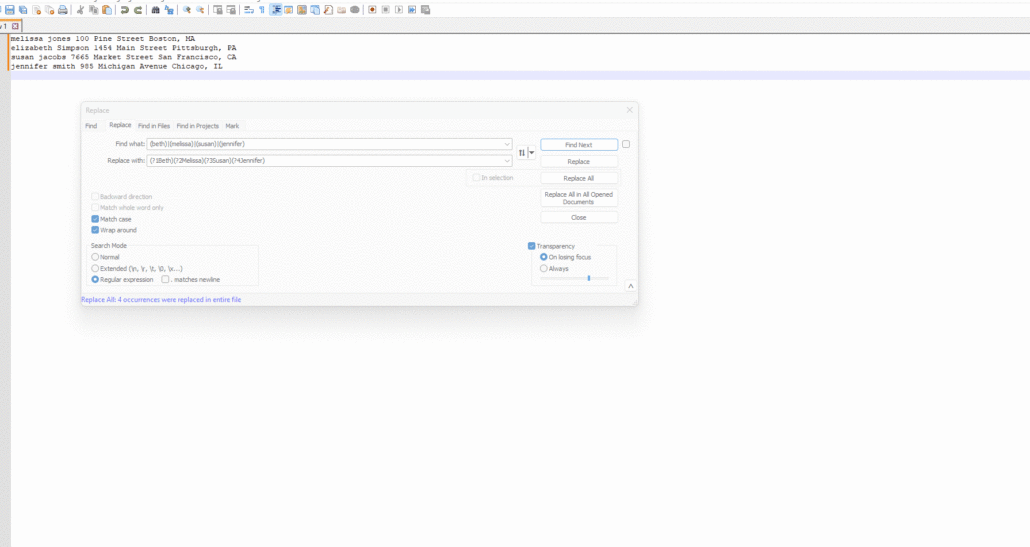
. . .the search will not only capitalize ‘Beth’ but will also capitalize the string ‘beth’ in ‘ElizaBeth’.
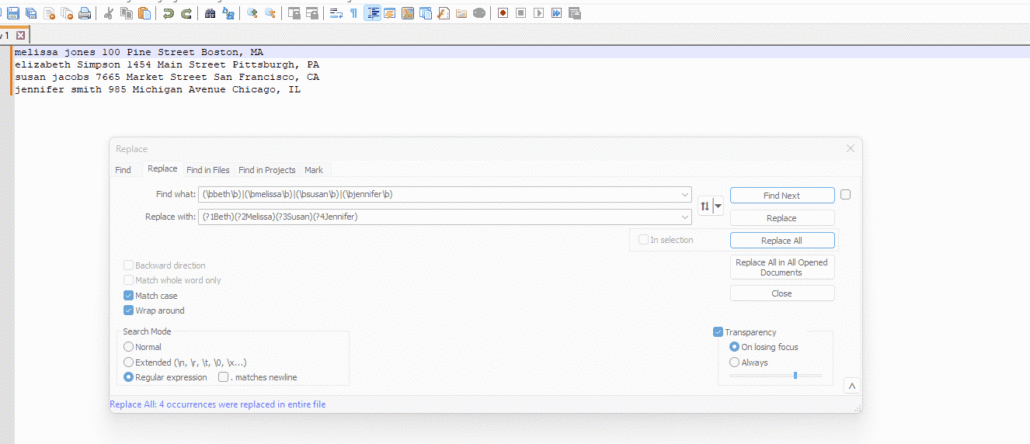
To prevent strings which are not words from being altered by the regex search use word boundaries around the searched for terms:
(\bbeth\b)|(\bmelissa\b)|(\bsusan\b)|(\bjennifer\b)
Interested in ACEDS’s educational content? Subscribe to the ACEDS Blog for weekly blog updates: https://aceds.org/aceds-blog/


